Fluffy White Bread, Gluten free, Vegan Recipe
Fluffy, white, soft, flexible, light gluten-free bread. I've been using this recipe for about 10 years. It's the recipe I pull out when I'm baking for a gluten eating crowd, because people always love it. When my niece was young she would only eat white bread. She could eat half a boule on her own. Now I think she'd old enough that she only restrains herself out of politeness. But that's how I know when something is really good, is when a kid who's too young to be polite, and normally eats gluten bread, will devour half a loaf.
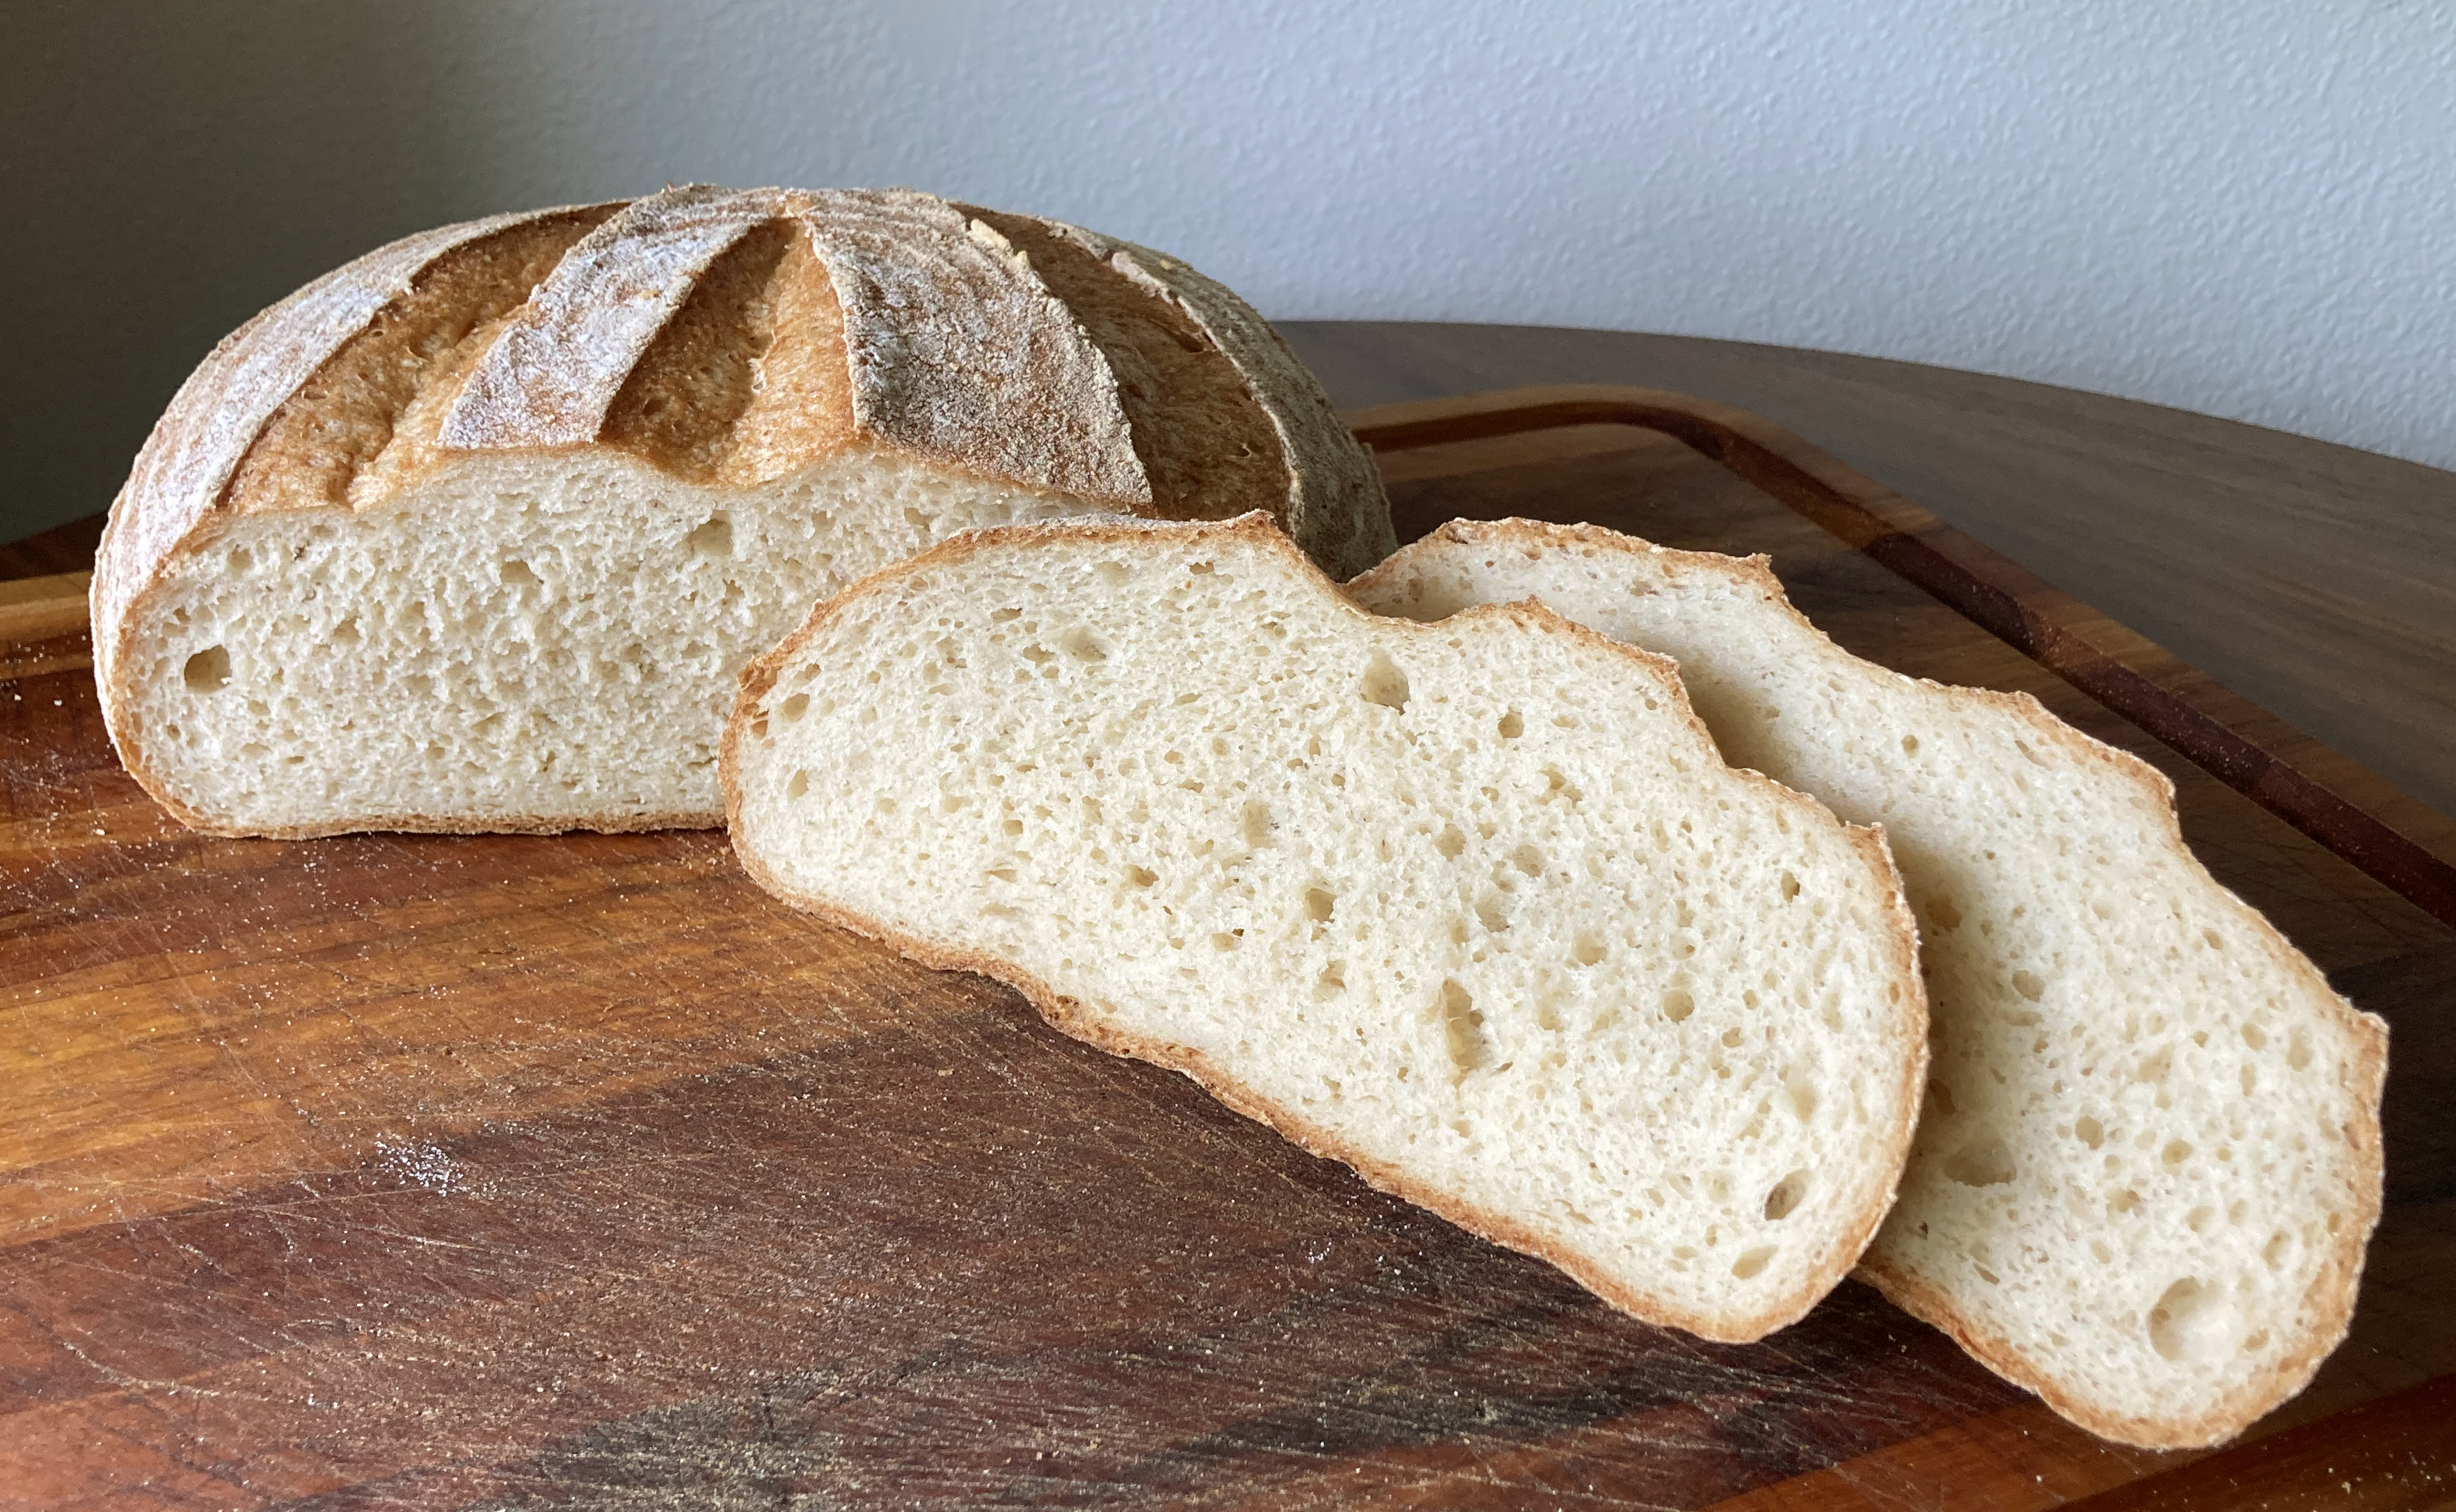
I've tried many variations on this recipe. It rarely fails, even with some wild ideas I've had. I always get a really good rise and the dough is really nice to work with. It's kneadable and shapeable. If you're new to gluten-free but know bread baking, this is the recipe that you should start out with to try gluten-free because the process is relatively "normal." It's a double rise, and it uses some techniques I learned growing up for how to let the bread rise, degas, shape, and bake.
Why two rises? Some say that gluten-free bread can't do a double rise. The reason this seems to be so is that some binders like xanthan gum can become compressed with additional handling. Also, gf flour seems to run out of food for the yeast more quickly than wheaten flour. In this recipe, I only use psyllium husk as the binder because it doesn't lose its elasticity with kneading. I also have you set aside some of the flour mix to add in later on the second rise so the yeast doesn't run out of fuel.
 |
| Whole Psyllium Husk |
First, a look at psyllium. This is the gluten replacement in this recipe, the thing that will make the dough kneadable and flexible enough to rise. If you're really looking for a white loaf, the type and brand of psyllium you use are important to the color. Some brands can discolor the bread and lend them a red or purple tint. Here are my two recommendations for a truly white psyllium that can be found on Amazon USA:
- Terrasoul Psyllium Husk Powder

- Himalaya Organic Psyllium Whole Husk

If you would like the bread to have the finest, lightest crumb use the powder. If you want to add some extra nutritional content to the bread with a very minimal difference in texture, use the whole husk.

Fluffy White Boule Bread Recipe
Egg free, dairy free, vegan, gluten free, rice free
Mix the flour blend in the bowl of a stand mixer or a large bowl and then set aside 75 grams for the second rise. 450g flour:
- 100g GF Oat flour (or substitute: sorghum flour)
- 50g millet flour (proso millet)
- 150g tapioca flour/starch
- 150g potato starch (NOT potato flour)
After setting aside 75g of the flour mix, add to the remaining 375g flour:
- 27g whole psyllium husk - OR - 20g powdered/ground psyllium husk
- 3g active dry yeast (a scant 1 tsp)
- 12g soy protein powder (optional, you may omit or substitute: whey protein (a milk product), pea protein, rice protein, dried milk powder, buttermilk powder, or any other protein powder)
Mix the dry ingredients together, minus the 75g of flour set aside.
Add the liquid:
- 490g water at about 100°f/32°c.
Mix the water into the dry ingredients until a smooth batter or dough forms. Let the mixture rise for 45 minutes to an hour, or until a finger dent in the surface stops filling back in right away. (This is called the finger poke test.) Once the dough has fully risen, punch it down and mix/knead in these additional ingredients:
- 75g reserved flour from the original flour mix
- 8.5g salt (about 1.25-1.5 tsp)
- 24g sugar (this is 2 Tbsp)
- 12g (1 Tbsp) Apple cider vinegar (optional: omit or substitute lemon juice or gf white vinegar)
Mix these ingredients just until fully combined. The dough should form a workable mass. Turn the dough out onto a lightly floured work surface. If it's too sticky/loose to handle, let it rest ten minutes. If it's manageable you can move to the next step right away.
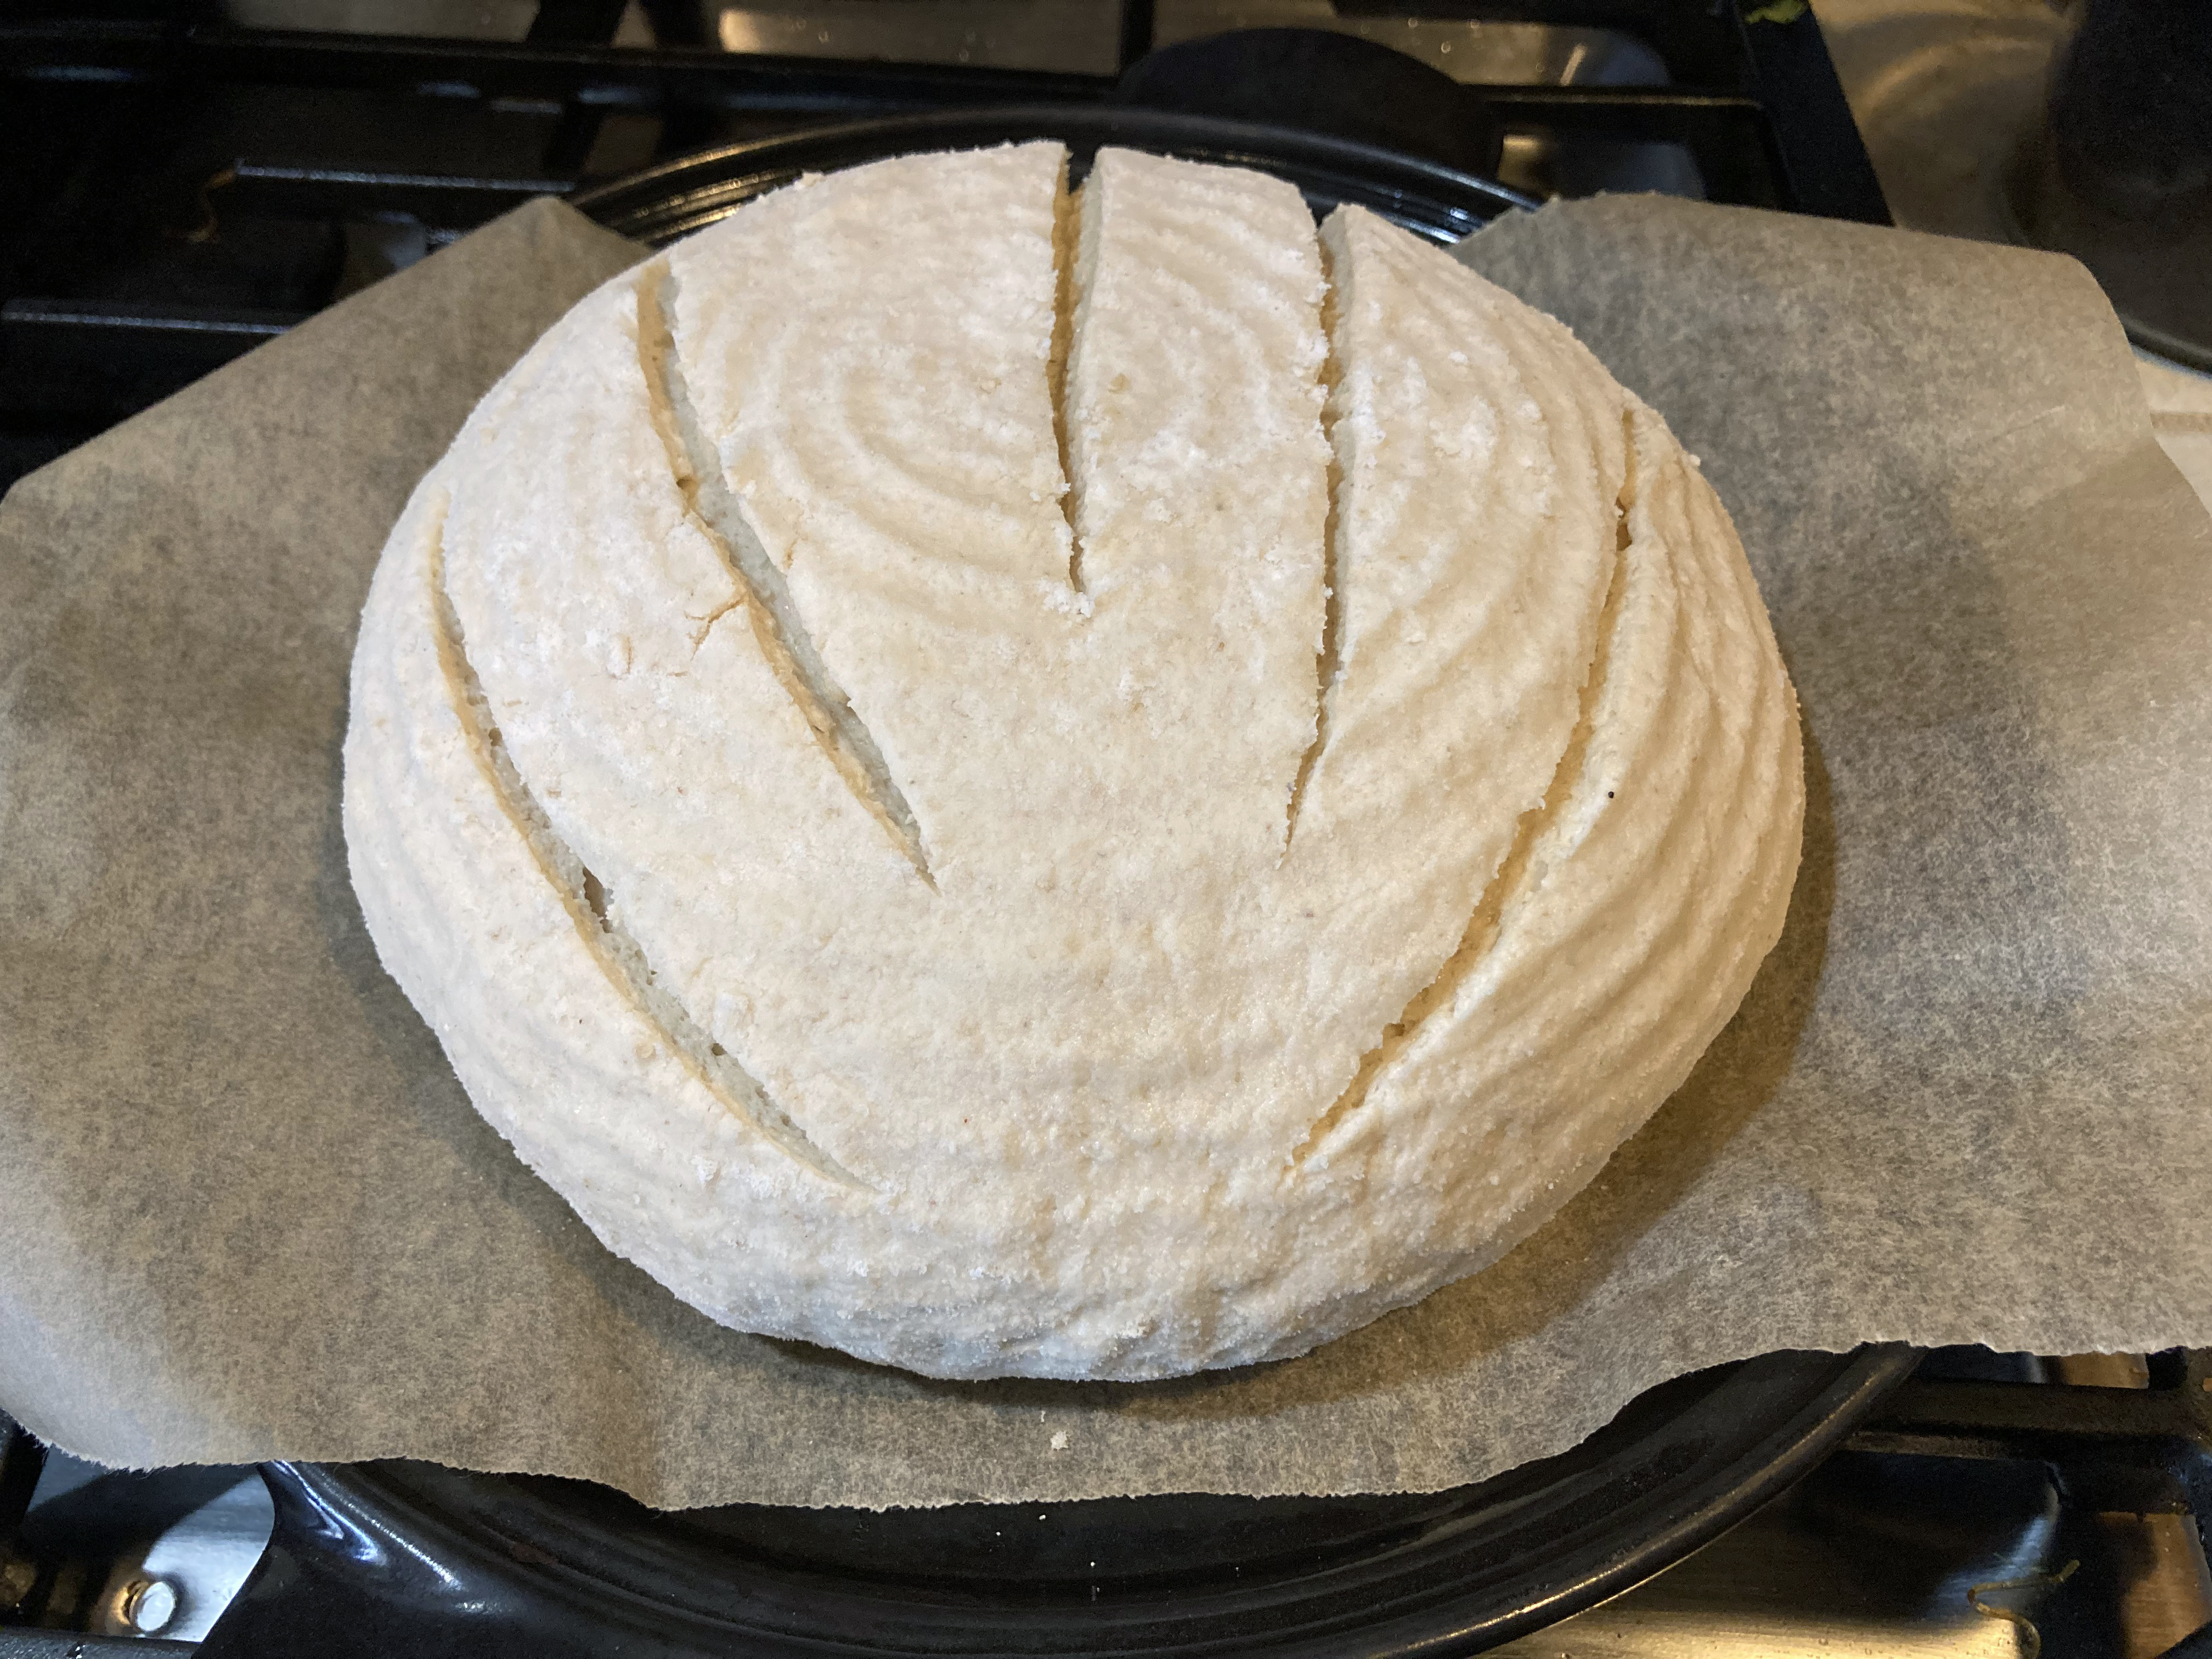
Shape the dough into a boule. A simple way to do this is to knead it a few times until a ball forms, then place it seam side down and tuck in the sides. Alternately you can use any traditional shaping technique you like. Place the dough into a floured banneton or a bowl lined with a heavily floured towel, seam side up. If you don't have a rising vessel you can oil the surface and let it rise on a piece of parchment paper or foil, seam side down. Cover with the mixing bowl or cover loosely with a towel not touching the upper surface. Let rise at room temp about 30 minutes.
Preheat the oven to 450°f/230°c so it's ready by the time the dough has risen, about 30 minutes from shaping. If you are using a cloche or dutch oven baking vessel preheat that with the oven. If you don't have a baking vessel you will have to add steam to the oven. There are many tutorials on this subject online, but it can take some experimentation to get it right for your individual oven. I use this Emile Henry baking cloche currently:


Comments
Will the bread hold its shape... Thanks
You can certainly form the bread into a batard shape. However, I don't recommend using this recipe to make a loaf in a tin. I haven't had success with converting this recipe into a sandwich tin loaf. See some of my sandwich bread recipes to find more ideas for sandwich loaves.
Substitute the millet with whatever you like the flavor of. Maybe buckwheat would work well. You could also try teff or more sorghum, but these grains might need a little more water to get the same fluffiness. The only thing I don't recommend is rice flour.
Gina,
I used your above recipe but used sorghum flour in place of the Ivory Teff (didn’t have it) and Oat flour in place of the Millet flour.
I also added 1 tsp. of yeast because I wasn’t sure how active my sorghum starter was. I mixed as directed and place the fairly wet dough in a 7” floured banneton. Imagine my surprise when after 3 hours I checked the dough and it had overflowed the banneton onto the counter. I wasn’t expecting that!! I put the dough into a 9” banneton to finish rising.
Should I cut short the 6 hour rise and chill the dough and bake? Or let it continue to rise for the entire 6 hours before chilling and baking?
Robin
Thank you.
Can't wait to bake this as it looks fabulous.
I just tried this recipe twice, and was incredibly impressed with the rise I got out of both loaves. They both baked beautifully, but unfortunately both suffered from collapse and gummy texture. Even the surviving part of the crumb underneath the top crust was gummy and looked nothing like the photos from your post. I baked the recipe as is, using psyllium husk powder rather than whole, and no protein powder as I don't have any on hand and you mentioned it could be omitted. The first bake was 25 minutes and sounded hollow when tapped. The second bake was 40 minutes (figured I'd try it, since I've never really overbaked a GF loaf) and it STILL suffered the same fate. Crust tasted amazing, so I'm determined to figure it out!
I’m sorry it didn’t work for you! It sounds like you are having a cave form under the top crust. This is usually caused by over proofing and/or too much liquid. This is very common in gluten free recipes because gf bread can over proof really quickly. Also ingredients can vary a lot from brands to brand. Try reducing the liquid by 20g and proof it about 15 minutes less than what you’ve done before on the last rise. Or another approach is to reduce liquid and proofing more drastically and work your way back up to your max level that works as you see the results of each bake. I hope that fixes the problem for you!
Love your bread and bread flours. I have a question though. In your section about blending your own blend you post that a maximum of 50% of starch would be taken. you have the happy medium of 40% starch, a dense one 30% and a white about 50%. In this recipe you use, as I calculate it 66% starch and 33% whole grain. Can you explain why you do this? Not to offend you but I just like to know what your thoughts were.
Thanks.