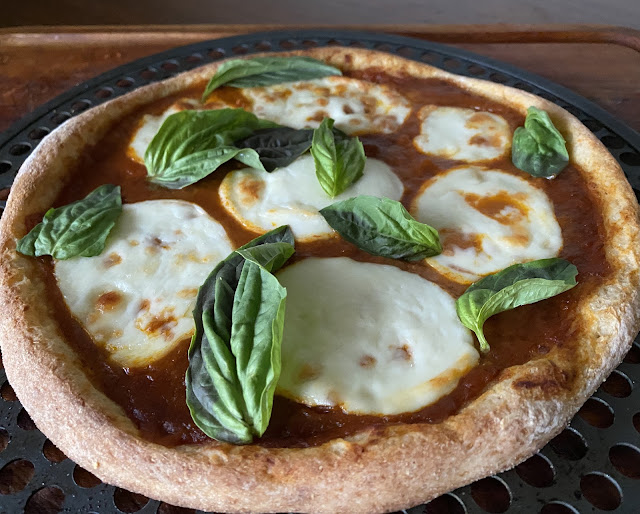
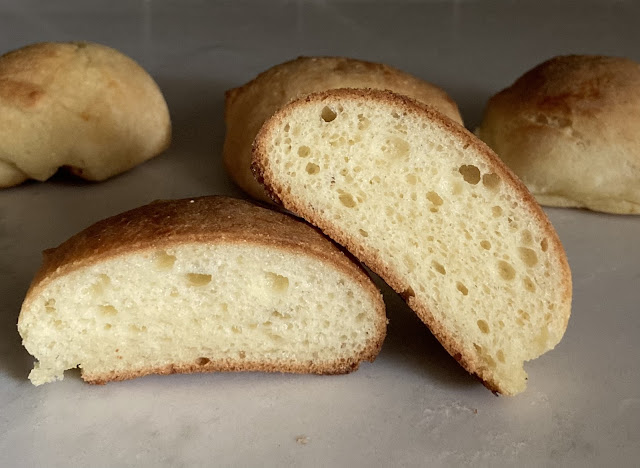
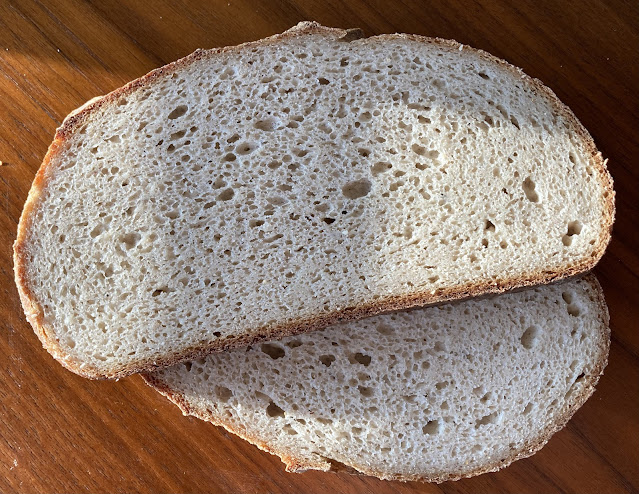
Monday, June 17, 2013

Gluten-free Chocolate Cupcakes


I like this recipe because it doesn't rely too heavily on the flour.  Any recipe that has as much chocolate and butter as it does flour is okay by my.  This method of making cake batter results in a spectacular spongy structure.  If you would like to make this with regular gluten-ful flour, simply substitute it out by volume and omit the chia seed if desired.


I adapted both of these recipes from the Joy of Cooking, which I use constantly for recipe inspiration.

Chocolate Cupcakes Recipe


Makes 9 large or 12 small cupcakes

Have all ingredients at room temperature.  Heat the oven to 350 F.

Whisk together in a medium mixing bowl, then set aside:

1/2 cup gluten-free cake or pastry flour with xanthan gum
1/2 cup dutch processed cocoa
1/4 tsp salt + a pinch
1 tsp baking powder
1/2 tsp chia seed

In the bowl of a stand mixer, cream with the paddle attachment for 30 seconds:

1 stick (1/2 cup) unsalted butter

With the mixer running on medium, slowly add:

1/2 cup granulated sugar
1/4 cup brown sugar

When the sugar is incorporated into the butter, set the mixer to high and whip the butter and sugar together until lightened in color and very fluffy, about 5 minutes.  It's ready when the butter feels light and fluffy on the tongue and the sugar is mostly dissolved.  Add one at a time and mix in on medium speed:

3 eggs

Slowly add the flour mixture and mix until it's just incorporated.  Scrape down the sides of the bowl and re-mix as necessary.

Divide the batter between 9-12 cupcake liners.  Bake at 350 for 15 minutes or until a toothpick inserted into the center of a cupcake comes out clean.  Let cool before frosting (see below for a delicious dark chocolate frosting recipe).


Bittersweet Chocolate Glaze or Frosting


Heat on low, stirring constantly until it's melted:

3 oz dark chocolate
3 Tablespoons water

Take the mixture off the heat and stir in:

3 Tablespoons butter

Stir the butter into the chocolate until very smooth.  Stir occasionally as it cools.  Use at 90 degrees for a glaze or at room temperature for a frosting.


Sunday, June 16, 2013

DIY Rhubarb Infused Vodka

Making your own DIY rhubarb-infused vodka isn't tricky at all.  All you need is two ingredients: rhubarb and vodka.  The only hard part is waiting the five days until it's ready before drinking it.


Preparation:

1. Have handy a large mason jar or sealable glass container large enough to accommodate the amount of vodka you have.  Chop rhubarb in 3/4-inch pieces to almost fill it, leaving about an inch or two free at the top of the container.
2. Pour the vodka over the rhubarb in the jar and fill to the top.
3. Seal the jar tightly.
4. Shake it.
5. Place the jar in a dark spot in your cupboard for five days.  Shake the jar occasionally to get everything stirred up.
6. When the rhubarb has infused the vodka sufficiently, the color of the liquid will be pink.  Taste the infusion to see if it's to your liking.  Leaving it for a few more days will make it stronger.
My jar lost a little volume during the tasting process.

7. Strain the vodka through a fine-mesh sieve into a bowl or jug.  Strain it again through cheese cloth if you want it to be very clear and not cloudy.  I strained mine into a vodka bottle with a cheesecloth-lined funnel.
8. Enjoy your rhubarb-infused vodka on the rocks or in a cocktail.


Saturday, May 25, 2013

Strawberry Rhubarb Pie

I like sweet things, but I don't like things too sweet.  Strawberry Rhubarb pie is usually too sweet for me.  The point for me isn't the strawberries; it's the rhubarb.  This recipe features both flavors without overwhelming either.  It's not nearly as sweet as most strawberry pie recipes.  Who needs all that sugar?  It has a lovely tart flavor but doesn't overwhelm the strawberries.  My rhubarb came up early this year and is flourishing.  The stalks aren't incredibly red, though, so the strawberries help out with the color.


Strawberry Rhubarb Pie Recipe

First you must have on hand a gluten-free pie crust.  If you are making this from scratch it takes about a half-hour so plan ahead.  You can make the pie filling before rolling out the dough while it's refrigerating to save time, or the crust can be made the day before and stored in the fridge if needed.  Once that is finished the making of the pie is very quick and easy.

Heat your oven to 425 F.

Roll out 1/2 of the chilled pie crust recipe on a piece of parchment paper.


Place the pie crust in the pan and peel off the parchment paper.


Carefully press the pie crust into the pan.  Repeat the rolling out of the dough for the top crust, but leave it on the parchment paper for now.  Place the pie pan and the top crust in the refrigerator while you assemble the filling.

For tips on dealing with a crust that's difficult to roll out, see the end of the post.

In a large bowl, place:

2.5 cups chopped rhubarb
1.5 cups sliced strawberry
Mix in a small bowl:
3/4 cups sugar (I used a combination of white and brown)
1/4 tsp salt


Sprinkle this flour mixture onto the fruit mixture with:

2 T orange juice (optional)

Mix the fruit and the flour mixture together with a wooden spoon until everything seems pretty well-distributed.  Don't worry if it's not perfect.  Take the pie pan out of the fridge and fill it with the fruit mixture.

(I topped the fruit with a few more slices of strawberry at this point because I decided the pie wasn't full enough.  Use your best judgement.)

Place the top pie crust onto the pie parchment-side up and peel away the parchment paper.  Fold the edges of the top crust over the edge of the bottom crust and crimp together.  I didn't do a fantastic job of this, but don't worry about it too much.  Patch any tears with scraps of crust and press everything together gently.  Cut slits for venting.

Brush the crust with an egg wash (Optional):

1 egg whisked with
1 Tbsp water


Bake the pie at 425 for 30-40 minutes or until the juices start coming up 


Gluten-free Pie Crust Tips: 

If the bottom crust isn't rolling out easily, there are a few things you can do to a gluten-free pie crust that  you can't do to a glutinous one.  You really can't over-work the crust - there's no gluten to make it stiff.  Even if you do end up working the butter into the dough, it won't be a disaster.  First, try kneading the dough a few times to soften it.  It may roll out better after that.  Another trick is to fold the dough over onto itself and re-roll if there are too many cracks.  You can do that several times as needed.  It gives you sort of a puff-pastry type texture which is really beautiful.

If the top crust isn't rolling out well, or completely falls apart, an alternative way to make it is to cut out the crust with cookie cutters and place the pieces in layers on top of the pie.  My sister made a great gluten-free apple pie with this method.

Tuesday, May 21, 2013

Pasta Amatriciana

If you've never tried guanciale, you should check it out.  It's like bacon, only better.  Made from the jowl of the pig, guanciale is the best part of the animal once it's cured.


Guanciale is the central umame flavor in Pasta Amatriciana, a rustic pasta dish from Italy.  It's simple to make and, thanks to the guanciale, it's incredibly delicious.

If you use the concept of prepping and cooking at the same time, this easy dish is very quick to make.

Pasta Amatriciana Recipe

Prep/Cook time: 30 minutes
Serves 2-3

Set your water to boil for the pasta and, at the same time, put a large pan on the stove to heat up on medium heat.  Toss in the pan:

some lardons of guanciale

While all that is heating up, cut up some:

shallots

Toss those in the pan with the guanciale that's rendering.   Cut into chunks:

1 pound fresh or frozen tomatoes

By this time the water should be at a boil.  When this is indeed the case, start cooking:

8 oz. pasta 

Add the tomatoes to the pan with the shallots.  Add:

salt to taste

Boil down the tomatoes to thicken the sauce.  In the meantime, grate:

parmigiano reggiano to taste


When the pasta is al dente, scoop out some of the starchy pasta water and set aside.  Drain and rinse the pasta.  If the sauce needs some extra moisture, add some of the pasta water you reserved and stir in.  

Turn the heat off under your pan.  Add the pasta to the sauce.  Stir it all together to incorporate.  If more liquid is needed, add some of that pasta water you reserved.  Add most of the parmesan cheese you grated and stir that in, too.  Plate your pasta and serve hot, topped with the rest of the parmesan.


Enjoy!

Saturday, May 4, 2013

Cinco de Mayo Chicken Enchiladas Verde

In celebration of Cinco de Mayo, I thought I'd post a really great enchilada recipe that my cooking partner and I came up with using my braised chicken tacos recipe.  This is the perfect way to use up some day-old corn tortillas.  Since you stack the enchilada instead of rolling, the tortillas are easier to manage.


Chicken Enchiladas Verde Recipe


makes 2-4 servings


In a heavy saucepan, heat:

1 Tbsp olive oil

Once the olive oil is hot, brown on both sides, one or two at a time:

4 boneless skinless chicken thighs

Brown them one at a time if necessary; don't crowd them in the pan.  Once there is nice browning on the bottom of the pan remove the chicken to a plate and pour in:

1/2 cup beer

Scrape up the browning from the bottom of the pan with a wooden spoon.  This browning makes the sauce deliciously rich.  Once the pan is completely deglazed, add the chicken back in and top the chicken with:

salsa verde
more beer if needed
salt to taste (depending on how salty your salsa is, you may not need any salt.  The flavors will concentrate as the dish cooks.)
1/2 tsp cumin seeds (optional)

Cook at a simmer until the meat is  very tender, 40-60 minutes.  If more browning forms on the bottom of the pan, scrape it up and incorporate it into the sauce. 

While the sauce is cooking, prep your other ingredients.  When the sauce is looking almost done, heat the oven to 400 F.  Grate:

8-12 oz. Jack cheese

When the chicken is tender, coat the bottom of a medium casserole dish with some of the sauce.  I used this Emile Henry 9x9 casserole dish:


Place on the sauce one of the:

corn tortillas

Place some of the chicken along the edge of the tortilla and top that with some of the cheese.  Don't be stingy with the sauce and cheese.  The rule of thumb is that you will never wish you had used more tortillas, but if you don't use enough sauce and cheese it may turn out dry.  Place another tortilla on top of that, and keep layering the stack up in the same manner until you start to run out of ingredients or the stack is big enough for your purposes.  Top the stack with the remaining sauce and some more cheese.


Bake the enchiladas for 20 minutes or until the cheese is nicely browned on top.  Let cool before serving.

Buen provecho!

If you're looking for more Mexican recipes, check out:

Creme Caramel (Flan)


Tuesday, April 30, 2013

What are Scones?

What are scones?  In short, they are my favorite pastry.  I think of scones often, so I thought I'd share a little bit about them with you, my readers.


Scones can be called a quick bread, a pastry, a tea cake.  However, they are most like a biscuit in structure.  The most traditional type of scone is made like a biscuit in that the fat - in this case butter - is cut into the flour to form chunks of fat in the dough.  When the scones are cooked the butter melts and leaves pockets of air in the scone.  This gives the little cakes a flakier texture.

Scones can be sweet or savory and made with all sorts of different flour blends and liquids.  They originated in Scotland.  The traditional Scottish scone would be made with white flour, butter, sugar, salt, and cream.  They might also traditionally be made with barley flour or oat flour.  Baking powder and/or baking soda are usually added for leavening.  Currants are often used for a fruit note.  They are traditionally served with the afternoon tea, although Americans seem to prefer them for breakfast.

Many scone recipes are a huge departure from these basic ingredients.  I have seen recipes for gluten-free vegan scones, chocolate scones, goat cheese scones - you name it.  The purist in me once scoffed at such transgressions from the traditional scone.  Now, my gluten-free lifestyle doesn't allow me to cling to tradition so closely.  Scones were the first recipe that I wanted to perfect when I went gluten-free.  It took about a year to do it.  I was dedicated!  Now, however, I have numerous scone recipes, many of which break from tradition on many levels.  I love them all.

What is your favorite scone?


Saturday, April 27, 2013

Baking Gluten-free Bread: a Reader's Success

This winter I came up with many new bread recipes which I published here on my blog.  All of them involved my bread mixes which came out last fall and which I ship anywhere in the United States.  One day on my Facebook page I got this comment from a reader in response to my vegan sandwich bread recipe:


Samantha Matete and I ended up swapping a bunch of messages about gluten-free bread making which eventually resulted in my blog post about how to make your own gluten-free bread flour blend.  Samantha ended up trying some of the ideas that I threw out.  I was excited to see pictures of her loaves once she did some experimenting.


Here are some notes from Samantha about what she did on these loaves of bread:


"Well I am definitely hooked on your bread recipes that I have been querying you about!
The first 2 photos are following the vegan sandwich bread recipe and method.
The 3rd photo is following the teff bread recipe and the 4th was a recipe by
glutenfreegirl and I had to use brown rice flour which I know you say just doesn't work
in gluten free bread baking and your right! It works in sweet baking I find though.
To say all the bread is edible and I know I can do better with more practice and
tweaking Also I used no eggs and replaced with an flaxseed 'egg' slurry mixture. It was
wonderful feeling to slice into a loaf and it didn't crumble apart! The last loaf was abit more
fragile and its either the rice flour or the recipe and method????? Like I said more
practice, experimenting and tweaking.
i have to say though that psylluim is the key in gluten free bread baking for sure!!!!!
This is the one I used from glutenfreegirl who also thinks psylluim is the key.


http://glutenfreegirl.com/2012/07/how-to-make-gluten-free-breadsticks/


I have been using just the flaxseed slurry mix '1 tbsp ground flaxseed mixed with 3 tbsp of 
hot water' per egg....
I forgot to add, as I don't know how much psylluim is in your package and when we first
started conversing about your sandwich bread recipes you said to start with 35g psylluim.
I worked it out that a tbsp of psylluim is 5g, so 35g is 7 tbsp and I thought that was abit
much as I know how psylluim works. So I dropped to 20g, 4 tbsp and that worked nicely
on the second loaf, not so dense.


Thanks for all your help.

Onwards and upwards in the world of gluten free baking!"


It's amazing to see people's results from their baking experiments.  Thanks Samantha for the great pictures of your loaves of bread!  They look wonderful!