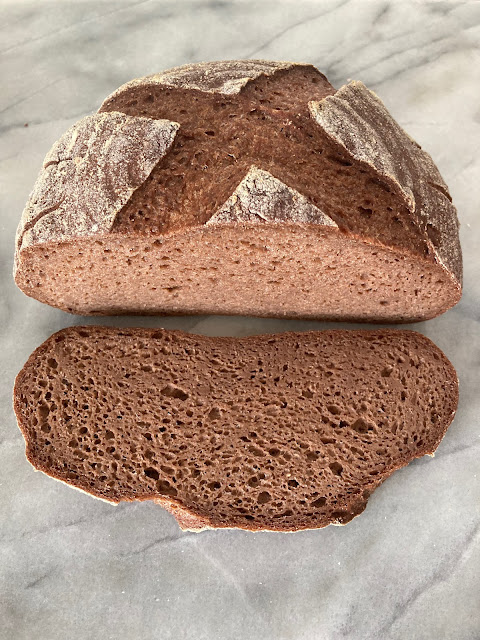
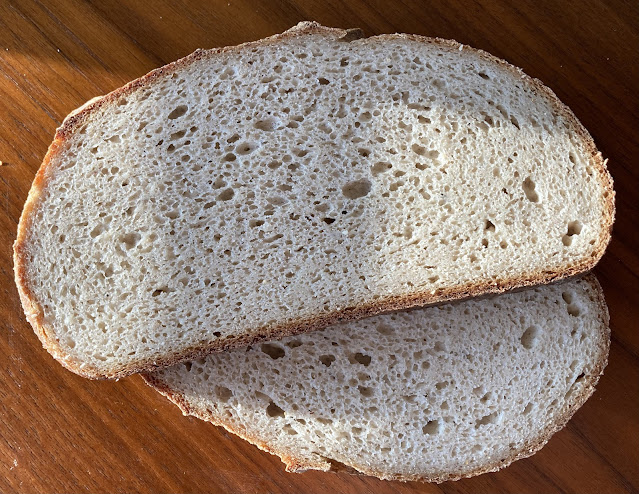
The crumb is very open but not too delicate. It has a chewiness to the texture that I associate with a good sourdough bread. The crust gets a nice browning and it toasts up nicely. And I don't mind the mustard falling through as much as I thought I would.
Many thanks to Michael Hollesen who came up with the original version of this recipe. We both borrowed ideas from other recipe developers including Roman Jan, and many others helped by sharing their experience and ideas.
For a variation on the recipe and method to add inclusions like cheese, peppers or herbs, check out this newer version of the recipe: https://glutenfreegourmand.blogspot.com/2023/08/cheddar-jalepeno-sourdough-bread-gluten.html
Mild Country White Sourdough Bread
Mix #1: 20-30 min
Rest time: 2 hours
Mix #2: 1-2 min
Rise time: 6 hours
Chill time: 20-40 minutes
Bake time: 45-55 minutes
Total time: 9-10 hours, or more if needed
If you don’t have a sourdough starter, fry this easy recipe ready in 5 days: https://glutenfreegourmand.blogspot.com/2023/03/teff-sourdough-starter-recipe-ready-in.html
Gel in a separate bowl:
265g Spring water at room temperature
25g Psyllium husk, ground
Mix in a stand mixer:
145g tapioca starch
145g potato starch
60g ivory teff (or brown teff for a more rustic look and pronounced whole grain flavor)
50g millet flour
30g potato flour
24g sugar
When dry ingredients are mixed, add:
40g sourdough starter, at or past its peak, preferably either teff or millet
12g or 1 tbsp apple cider vinegar
100g egg whites (3 egg whites for me)
150g Spring Water*
Mix with paddle attachment on low. The dough will look crumbly at first but mixing for three minutes should create a wet dough. If mixing by hand, it may take a little longer but you don't have to mix constantly.
Add the psyllium gel from the first step to the wet dough and mix until well combined, about two minutes.
Mix on low until incorporated:
15g pink Himalaya salt
Let rest in bowl of stand mixer, covered, about 2 hours.
Mix the dough again about 1 minute, scraping down the sides and re-mixing if needed. Scoop the dough into a floured banneton and smooth the top so it's evenly distributed.
Check the level it’s at and note the height of the center of the dough or take a photo.
Let rise (covered) at room temp ~70°f/21°C until it just barely starts rising, 6 more hours or about 8 hours total ferment time from first mix. The top will dome up about one rung higher on the banneton. Other indications of readiness are that the dough starts looking puffier on the surface, that it no longer smells like raw flour, and it’s jiggly and springy when poked. The surface is suddenly less tacky.
Conversely, signs that it is not ready at the 8-hour mark are that it has sunken, spread out or shrunk slightly, that it still smells like raw dough, and that the center looks very raw and maybe even transluscent. The pattern of dough on the surface is still very sharp and defined. If the dough is not ready yet and shows these signs of underfermentation, it may take several more hours for it to proof. This can be a sign that the starter was not active enough or that the ambient temperature is a little low. It will proof but it can take some extra patience.
Once the dough starts rising, place the banneton, still covered, in the freezer for 30-40 minutes. In the mean time preheat your oven to 450°f/230°C. Remove the chilled dough from the freezer and carefully invert onto lightly floured piece of parchment paper. Lightly flour around the edges of the boule. Shape the dough into a boule by carefully and gently pulling the edges toward you and tucking them under the loaf with the long side of the hand or a bench scraper. Be as gentle as possible since the dough is already proofed. The chilling helps with handling but care is needed to shape gluten-free dough after it has risen. After shaping transfer the bread to the pre-heated baking vessel and score. If doing the one-slash score on a boule (as pictured) it needs additional decorative scoring to expand correctly and vent additional water as the hydration is so high.
 |
| This is the scoring pattern and placement I've found creates the best belly |
Bake 30 minutes covered, 5 minutes uncovered, and 10 minutes straight on the rack. If at any point it starts looking too brown on top before the bottom is set, then turn down the heat in the oven. Since this recipe has so much egg it’s best not to brown it too much because egg burns easily. If it still needs additional time (not hollow sounding tapped on bottom) then leave it in the oven right on the rack with the oven turned off and the door closed. After the bottom of the loaf is set and firm, and makes a very hollow sound when tapped with the knuckles, you can cool it on a cooling rack, or, if you would like to prevent shrinkage, you can cool it in the oven for awhile with the door cracked open. I usually do this if the seam of the bloom isn’t completely set and crusty on top. I’ve been baking at night and cutting open the next day but I don’t know if that’s necessary to wait so long.
*A note about hydration:
My recipes in general seem to need hydration adjustments for other climates/other grinds of flour/random acts of nature. This recipe for me can go either up or down in hydration and still come out. A higher hydration might create a slightly tackier feel to the inside, but the bread will stay fresh longer and have a more open crumb. A lower hydration makes the dough a little bit easier to handle and shape. It can take a few tries with a new recipe to nail down the perfect hydration for any baker.


Comments
Thanks also for letting everyone know the modifications that have worked for you. The high amount of egg in this recipe inhibits the yeast a bit, so adding a pinch of baker's yeast to boost a sluggish starter is a good call. I was wondering if dried egg white would work, thanks for testing that! I've also played with the chill time and it doesn't hurt to go longer. Probably every fridge is different too so it may vary by user. I'm so glad you like the recipe!
I made your sourdough bread and my husband says it’s the best bread I have made. I have to agree. I was a little nervous because I put it in the fridge right before bedtime and thought it might not rise staying too long in the fridge. Instead it rose so much I was afraid it had lost all its rise and that the small amount of starter would not be enough to keep the rise in the oven. It did not fall, the crust is perfect, it is soft and you couldn’t tell it was gluten free. This may be the only sourdough bread recipe I need. Thank you so much for sharing your recipes.
Janet
Continuing with my last comment:
I put the dough in a 9” banneton and put it in the freezer for 1 hour. However, the dough was so wet it got stuck in the banneton even though it was well-floured. I gently pried it away from the sides with a stiff spatula, but the crown of the loaf stayed in the banneton. Even though freezing helped the dough to keep its shape, it spread out quite a bit.
Which of the starches or flours could I add to the dough so it was not so wet?
I’m really excited to try this recipe and have two quick questions. Do you think this will work using a sourdough starter made with superfine brown rice flour? Also, do you have a suggested substitute for the millet flour which I avoid because of thyroid issues. Thanks so much!
Jayne
I’m excited to try the recipe!
I am wondering if we can bake this bread with instant yeast and also can we do it eggless?
Any substitution for potato flour?